Leaked: How To Make An Adjustable Bracelet That's So Addictive, It's Almost Illegal!
Have you ever struggled with bracelets that are either too tight or too loose? Or perhaps you've spent hours crafting a beautiful handmade bracelet only to realize it doesn't fit properly? What if I told you there's a simple solution that transforms your bracelet-making game forever? In this comprehensive guide, I'll reveal the secrets to creating adjustable bracelets that fit perfectly every time—no measuring required!
Introduction to Adjustable Bracelets
Adjustable bracelets are the ultimate solution for jewelry makers and wearers alike. Unlike traditional fixed-size bracelets, adjustable designs offer versatility and comfort that make them irresistible. The magic lies in the sliding knot mechanism, which allows the wearer to tighten or loosen the bracelet with ease. This means your handmade creations will fit anyone, regardless of wrist size!
The beauty of adjustable bracelets is their universal appeal. Whether you're making friendship bracelets, hemp jewelry, leather cord pieces, or beaded designs, the adjustable feature adds professional quality to your work. Plus, you'll never have to worry about sizing again—just create, adjust, and enjoy!
Essential Materials and Tools
Creating adjustable bracelets requires minimal supplies, making this an accessible craft for beginners and experienced jewelry makers alike. The basic materials you'll need include:
- Cord or string of your choice (hemp, leather, nylon, silk, or waxed cotton)
- Scissors for cutting the cord to length
- Beads (optional, for decorative designs)
- Clipboard or tape to hold your work steady while knotting
The type of cord you choose will significantly impact your bracelet's final look and feel. Hemp cord creates a rustic, earthy vibe perfect for casual wear. Leather cord offers a more sophisticated appearance suitable for both men and women. Nylon and silk cords work beautifully for delicate, feminine designs.
Understanding the Sliding Knot Technique
The sliding knot is the cornerstone of adjustable bracelet making. This clever knot allows the bracelet to expand and contract while maintaining its shape and security. Learning how to tie this knot correctly is crucial—once mastered, you can apply it to countless jewelry projects.
The sliding knot works by creating two loops that slide against each other. When pulled in opposite directions, the loops tighten, securing the bracelet. When pulled in the same direction, the loops slide, loosening the bracelet. This mechanism is what makes the bracelet adjustable and comfortable for any wrist size.
Common Mistakes to Avoid
When learning the sliding knot technique, beginners often encounter a few common pitfalls. One frequent mistake is tying the knot too tightly, which prevents the bracelet from adjusting properly. Another issue is using cord that's too thick or stiff, making it difficult for the knots to slide smoothly.
To avoid these problems, practice with different cord types and thicknesses. Start with medium-weight cords that have some flexibility. Pay attention to your tension—the knots should be secure but not overly tight. Remember, the beauty of adjustable bracelets is their ability to move and adapt!
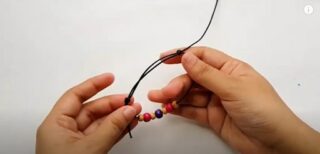
Step-by-Step Sliding Knot Tutorial
Creating a sliding knot might seem complicated at first, but with practice, it becomes second nature. Here's a detailed breakdown of the process:
Prepare your cords: Cut two pieces of cord—one for the bracelet body and two shorter pieces for the sliding knot. The main cord should be about 30-40 inches long, while the knot cords should be 12-15 inches each.
Create the bracelet base: Fold the main cord in half and tie an overhand knot at the folded end, creating a loop. This loop will serve as one end of your adjustable bracelet.
Position the knot cords: Place the two shorter cords perpendicular to the main cord, about 4-5 inches from the loop end. The center of these cords should align with the main cord.
Tie the sliding knot: Using the two shorter cords, create a series of square knots (also called cobra stitches) around the main cord. Make approximately 5-7 square knots, depending on your cord thickness.
Secure and trim: Once you've tied enough knots, secure the ends with a dab of clear nail polish or jewelry glue. Trim the excess cord, leaving about 1/4 inch tails.
Test the adjustment: Pull the main cord ends to ensure the knots slide smoothly. If they're too tight, gently loosen them with your fingers.
Creating Different Bracelet Patterns
While the sliding knot technique remains consistent, you can incorporate various patterns and designs to create unique bracelets. One popular pattern is the chevron design, which creates a distinctive V-shaped pattern that looks complex but is actually quite simple to execute.
The chevron pattern involves alternating the direction of your knots to create the characteristic zigzag effect. This pattern works particularly well with embroidery floss or thin cord and can incorporate multiple colors for a vibrant, eye-catching design.
Beaded Adjustable Bracelets
Adding beads to your adjustable bracelets elevates them from simple accessories to statement pieces. The key to incorporating beads is to plan your design carefully. You can string beads onto the main cord before creating the sliding knot, or add them between knot sections for a segmented look.
When working with beads, consider their size and weight. Larger beads may affect how smoothly the sliding knot functions, so you might need to adjust your knotting technique accordingly. Smaller beads typically work best and add subtle elegance to your design.
Advanced Techniques and Variations
Once you've mastered the basic sliding knot, you can explore more advanced techniques to create professional-quality jewelry. One such technique involves creating a double sliding knot system, which provides even more adjustability and a cleaner finish.
Another variation is the fisherman's knot, which creates a more secure sliding mechanism ideal for heavier cords or outdoor-inspired designs. This knot is particularly useful for men's jewelry or pieces that need to withstand more wear and tear.
Adjustable Necklaces
The sliding knot technique isn't limited to bracelets—it works beautifully for necklaces too! Creating adjustable necklaces allows you to customize the length based on your outfit or neckline. The same principles apply, but you'll typically use longer cords and may incorporate different knotting patterns.
Adjustable necklaces are especially practical because they can transition from choker length to long pendant styles with a simple adjustment. This versatility makes them perfect for travel or for those who prefer minimal jewelry collections.
Troubleshooting Common Issues
Even experienced jewelry makers encounter challenges when creating adjustable pieces. One common issue is knots that won't slide smoothly. This usually occurs when the cord is too thick for the knot size or when the knots are tied too tightly.
If your knots aren't sliding, try gently working them back and forth with your fingers to loosen them. You can also apply a tiny amount of beeswax or candle wax to help the knots move more smoothly. For persistent issues, consider using a different cord type or adjusting your knotting tension.
Another frequent problem is the bracelet coming undone. This typically happens when the initial knots aren't secure enough. To prevent this, make sure to tie your starting knots tightly and consider adding a drop of jewelry glue for extra security.
Project Ideas and Inspiration
The versatility of adjustable bracelets means the creative possibilities are endless. Here are some project ideas to inspire your next creation:
Friendship Bracelets: Create colorful adjustable friendship bracelets using embroidery floss. The sliding knot makes them perfect for sharing with friends of different wrist sizes.
Bohemian Chic: Combine leather cord with natural stone beads for a boho-inspired adjustable bracelet that's both stylish and meaningful.
Minimalist Designs: Use thin silk cord with a single accent bead for an elegant, minimalist adjustable bracelet suitable for any occasion.
Men's Jewelry: Create rugged adjustable bracelets using paracord or thick leather cord with metal accents for a masculine look.
Beach Vibes: Incorporate seashells, sea glass, or wooden beads with hemp cord for a coastal-inspired adjustable bracelet.
Tips for Success
Creating perfect adjustable bracelets takes practice, but these tips will help you achieve professional results:
Practice with inexpensive materials first to perfect your technique before moving on to more expensive cords or beads. Pay attention to cord quality—higher-quality cords knot more smoothly and create more durable pieces.
Experiment with different knotting patterns to find what works best for your chosen materials. Don't be afraid to make mistakes—each "failed" attempt teaches you something valuable about the technique.
Consider your audience when choosing materials and designs. What works for a teenage friendship bracelet might not be appropriate for a sophisticated adult accessory.
Conclusion
Mastering the art of adjustable bracelets opens up a world of creative possibilities in jewelry making. The sliding knot technique is truly transformative—once you learn it, you'll wonder how you ever made jewelry without it! Whether you're crafting friendship bracelets, elegant necklaces, or rugged men's jewelry, the ability to create adjustable pieces adds professional quality and versatility to your work.
Remember, the key to success is practice and patience. Start with simple designs and gradually work your way up to more complex patterns. Don't be discouraged if your first attempts aren't perfect—every jewelry maker starts somewhere, and the satisfaction of creating a beautiful, functional adjustable bracelet is well worth the learning curve.
So gather your materials, watch some tutorial videos, and start experimenting! Before you know it, you'll be creating adjustable bracelets that are so addictive, your friends will be begging you to make them one too. Happy crafting!

How to make adjustable bracelet😜 #adjustablebracelet #bracelettutoria
How To Make An Adjustable Bracelet? A Step by Step Guide

How to make adjustable bracelet – Artofit

