Forbidden Sewing Hack: So Addictive, It's Like Porn (Hem Dress Pants In Under 5 Minutes)
Have you ever stared at your closet full of beautiful dress pants, only to realize they're all too long? That frustrating moment when you know you need to hem them but dread the thought of taking them to a tailor or wrestling with a sewing machine? What if I told you there's a forbidden sewing hack so addictive, it's like porn for DIY enthusiasts? This game-changing technique will let you hem dress pants in under 5 minutes, with or without a sewing machine, and the results look professionally done.
Whether you're a complete beginner or someone who's been avoiding hemming projects for years, this comprehensive guide will transform you into a hemming pro. From invisible stitches that disappear into the fabric to no-sew methods that require zero experience, you'll discover techniques that tailors don't want you to know about. Get ready to revolutionize your wardrobe and save hundreds of dollars on alterations.
Why Learning to Hem Dress Pants Is a Game-Changer
Learning to hem dress pants professionally is one of those life skills that pays dividends for years to come. The average person spends $15-30 per pair of pants on professional alterations, and those costs add up quickly. When you can do it yourself, you're not just saving money—you're gaining independence and creative control over your wardrobe.
- Exclusive Leak See Ninja 400 Hit Its Top Speed In This Shocking Clip
- Leaked The Nude Photo Of Yungblud And Billie Eilish That Broke The Internet
The beauty of mastering hemming is that it's transferable to virtually every garment in your closet. Once you understand the principles of creating a clean, durable hem, you can apply them to skirts, dresses, sleeves, curtains, and even tablecloths. It's like learning to cook one recipe and suddenly being able to prepare hundreds of dishes.
Essential Tools and Materials for Professional Hemming
Before diving into the techniques, let's gather the essential tools that will make your hemming projects look professional every time. Having the right equipment is half the battle when it comes to achieving that store-bought finish.
Basic Hemming Toolkit
- Sharp fabric scissors or rotary cutter
- Measuring tape or hem gauge
- Straight pins or fabric clips
- Iron and ironing board
- Thread that matches your fabric color
- Hand-sewing needles in various sizes
- Seam ripper (for correcting mistakes)
- Fabric chalk or disappearing ink pen
For machine hemming, you'll also want:
- A sewing machine with adjustable stitch length
- Blind hem foot attachment (optional but helpful)
- Walking foot for thick fabrics
- Ballpoint needles for knits
How to Sew an Invisible Hem Stitch by Hand
The invisible hem stitch is the holy grail of hand sewing techniques. When done correctly, your stitches disappear completely into the fabric fold, leaving no visible thread marks on the outside of the garment. This method is perfect for dress pants made from wool, cotton blends, or other medium-weight fabrics.
Start by turning your pants inside out and folding up the hem to your desired length. Press this fold with a hot iron to create a crisp edge. The key to invisibility is working with very small stitches—think 1/8 inch or less—and catching only a single thread from the pant leg fabric with each stitch. This technique takes practice, but once mastered, it's incredibly satisfying.
To execute the invisible stitch, bring your needle up through the folded hem allowance, then pick up just one or two threads from the main fabric. Take a small stitch in the hem fold, about 1/4 inch long, then repeat the process. The tension is crucial—too tight and the fabric will pucker, too loose and the hem will sag. Practice on scrap fabric first to get the feel right.
Machine Hemming Techniques for Speed and Precision
If you have access to a sewing machine, hemming becomes significantly faster and can produce equally professional results. Modern sewing machines offer several stitch options specifically designed for hemming, including blind hem stitches, stretch stitches for knits, and decorative finishes.
The blind hem stitch on a machine creates tiny, almost invisible stitches that catch the fabric in a way similar to hand sewing but much faster. You'll need a blind hem foot, which has a guide that helps you position the fabric correctly. The trick is folding the fabric in a specific way so the machine only catches a few threads from the garment's right side while sewing mostly on the hem allowance.
For straight hems on stable fabrics, a simple straight stitch works perfectly. Set your stitch length to 2.5-3mm for dress pants, and use a thread color that matches your fabric. Always test your stitch on a scrap piece first—different fabrics may require tension adjustments for the best results.
No-Sew Methods for Emergency Hemming
Sometimes you need to hem pants but don't have access to sewing supplies. Maybe you're on vacation with only a needle and thread, or you need a quick fix before an important meeting. These no-sew methods can be lifesavers in a pinch.
Fabric tape, also known as hem tape or fusible web, is a fantastic option for temporary hems. Simply cut the tape to length, place it between the hem fold and the pant leg, then press with a hot iron according to the package directions. The bond isn't permanent—it will wash out eventually—but it's perfect for quick fixes or testing hem lengths before committing to sewing.
For an even faster solution, try the folding method: fold the excess fabric to the inside, press with an iron to create a sharp crease, then secure with safety pins or even double-sided fashion tape. This won't hold up to washing, but it can get you through a day of wearing pants that are slightly too long.
Understanding Different Hem Widths for Various Fabrics
One of the secrets professional tailors use is adjusting hem width based on fabric weight and garment type. This technique ensures your hems always look proportional and professional, regardless of what you're working on.
For lightweight fabrics like voile, chiffon, or silk, a narrow hem of 1/4 to 1/2 inch looks best. These fabrics are too delicate to support wider hems, which would create bulk and stiffness. I generally run my basting stitch at 1.5cm (or even 1.2cm) for these materials, creating a clean, subtle finish.
For medium-weight fabrics like cotton twill or lightweight wool, a 1-inch hem provides stability without adding unnecessary bulk. On something thicker, like denim or heavy wool for pants, shorts, or a dress, I might run the basting stitch at 5cm. This wider hem provides the structure needed to support the fabric's weight and creates a more substantial, professional-looking finish.
Hand Sewing Stitches for Perfect Hems
There's an art to hand sewing hems that goes beyond just making functional stitches. Different hand stitches create different effects, and knowing which to use for each project elevates your work from amateur to professional quality.
The catch stitch is excellent for hemming dress pants because it's flexible and allows the fabric to move naturally. Working from left to right, take small stitches that catch the hem allowance and then the garment fabric, creating an X pattern on the wrong side. This stitch has a bit of give, which prevents popped stitches when the fabric stretches or moves.
For a truly invisible finish, the slip stitch is your best friend. Bring the needle through the folded edge of the hem, then pick up just one or two threads from the garment fabric before taking another stitch in the hem fold. The key is keeping your stitches tiny and consistent—this is what makes them disappear completely.
16 Types of Hemming Stitches to Master
Building your repertoire of hemming stitches is like expanding your vocabulary—each one serves a specific purpose and creates a unique effect. Here are 16 essential stitches every sewing enthusiast should know:
- Blind hem stitch - Nearly invisible from the right side
- Slip stitch - Perfect for invisible hems
- Catch stitch - Flexible and great for knits
- Running stitch - Basic but versatile
- Backstitch - Strong and durable
- Whip stitch - Quick and secure
- Blanket stitch - Decorative and functional
- Fell stitch - Nearly invisible on both sides
- Herringbone stitch - Traditional and decorative
- Cross stitch - Strong and decorative
- Overcast stitch - Prevents fraying
- Buttonhole stitch - Strong and decorative
- Ladder stitch - Nearly invisible
- Feather stitch - Decorative and light
- Coral stitch - Textured and decorative
- Knotted stitch - Secure and decorative
Each of these stitches has its place, and experimenting with them will help you understand which works best for different fabrics and applications.
Finishing Raw Edges to Prevent Fraying
One of the most important aspects of professional hemming that beginners often overlook is edge finishing. Raw fabric edges, especially on woven materials, will fray over time, destroying your beautiful hem work. Taking the time to finish these edges properly ensures your hems last for years.
For woven fabrics, there are several effective edge-finishing techniques. The zigzag stitch on your sewing machine encases the raw edge in thread, preventing fraying. A serger creates a professional-looking finished edge with its overlock stitch, though this requires specialized equipment. For a no-machine option, pinking shears cut a zigzag edge that significantly slows fraying, though it's not completely foolproof.
French seams are another elegant solution, enclosing the raw edge completely within the seam itself. This technique is particularly beautiful on lightweight fabrics and creates a very clean, professional finish. Bias tape binding is another option that adds a pop of color while protecting the edge—great for unlined garments where the inside might be visible.
Professional Hemming Techniques for Different Garments
Different garments require different hemming approaches to achieve that professional, store-bought look. Understanding these nuances will help you tackle any hemming project with confidence.
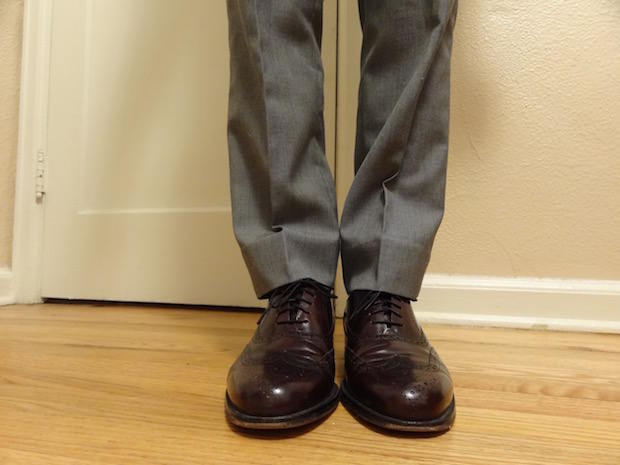
For dress pants, a blind hem is typically the gold standard. It's nearly invisible from the right side and provides a clean, professional finish that moves naturally with the fabric. The key is using the right needle size—if you start seeing skipped stitches, you likely need a larger needle. For heavier wools, a size 90/14 needle usually works well, while lighter cottons might only need a 75/11.
Skirts and dresses often benefit from wider hems, especially if they're full or A-line styles. A 2-inch hem provides the weight needed to help the garment hang properly. For circle skirts or very full styles, a narrow rolled hem might be more appropriate to avoid bulk at the hemline. The rolled hem is particularly beautiful on lightweight fabrics and creates a delicate, professional finish.
The Rolled Hem: Perfect for Lightweight Fabrics
The rolled hem is a game-changer for working with delicate, lightweight fabrics like chiffon, silk, voile, or even lightweight cotton. This technique creates an incredibly narrow, clean finish that doesn't add bulk or weight to the fabric edge.
While you can create a rolled hem entirely by hand, using a rolled hem foot on your sewing machine makes the process much faster and more consistent. These specialty feet automatically fold the fabric edge twice as you sew, creating that perfect narrow hem. The key is practicing on scraps first—different fabrics behave differently, and you'll need to adjust your technique accordingly.
For hand-sewn rolled hems, start by folding the edge under about 1/8 inch and pressing it flat. Fold it under again the same amount, press again, then stitch close to the inner fold. This double fold completely encases the raw edge, preventing fraying while creating a beautiful, delicate finish. It's time-consuming but worth it for special garments.
Using the Right Needle for Professional Results
One telltale sign that you need a larger needle is when you start seeing skipped stitches on the hem when your needle worked just fine to sew the project together. This is a common frustration for beginners, but understanding needle selection can solve many hemming problems.
Needle size should be chosen based on both fabric weight and thread thickness. For lightweight fabrics like silk or chiffon, a size 60/8 or 70/10 needle works well. Medium-weight fabrics like cotton or linen typically need a 75/11 or 80/12. Heavy fabrics like denim or thick wool require 90/14 or even 100/16 needles.
The needle type matters too. Ballpoint needles are essential for knits as they slide between fabric threads rather than piercing them. Sharp needles work best for woven fabrics. Universal needles are a good all-purpose choice but may not give the best results on specialized fabrics.
Three Essential Hemming Techniques for Every Sewer
Together, these 3 techniques cover the bulk of hemming scenarios you'll encounter in everyday sewing. Mastering them will prepare you for virtually any hemming project that comes your way.
The first is the blind hem, perfect for dress pants, skirts, and any garment where you want an invisible finish. This technique uses specialized stitches that barely catch the garment fabric, creating stitches that are nearly invisible from the right side. It works on most woven fabrics and provides a professional, tailored look.
The second is the rolled hem, ideal for lightweight fabrics and creating delicate edges on scarves, handkerchiefs, or the hem of a flowing dress. This narrow hem doesn't add bulk and creates a beautiful, professional finish on fabrics that would be overwhelmed by wider hems. It's particularly useful for sheers and silks.
The third is the double-fold hem, the workhorse of hemming techniques. This straightforward method works on almost any fabric and provides a clean, durable finish. Simply fold the raw edge under 1/4 inch, press, then fold again to the desired hem width, press again, and stitch close to the inner fold. It's simple but effective and appropriate for everything from jeans to curtains.
Practice Makes Perfect: Building Your Hemming Skills
The best way to master hemming is through practice and experimentation. Start with simple projects and gradually work your way up to more challenging fabrics and techniques. Every hem you sew teaches you something new about fabric behavior, stitch selection, and tension adjustment.
Begin by practicing on scrap fabric before working on actual garments. Cut strips of different fabric types—cotton, wool, silk, denim—and practice various hemming techniques on each. Notice how each fabric responds differently to folding, pressing, and stitching. This experimentation will build your intuition for which techniques work best for which fabrics.
Once you're comfortable with basic techniques, challenge yourself with more complex projects. Try hemming a circle skirt to understand how to ease fabric around curves. Work with sheer fabrics to master the rolled hem. Experiment with decorative hem finishes like bias tape or decorative stitches. Each new challenge expands your skill set and builds confidence.
Offering Your Services: From Beginner to Pro
After you've practiced on a few pairs of pants and mastered the basic techniques, consider offering to hem your friends' pants. This not only helps you gain more experience but can also turn into a small side business. Many people are willing to pay for quality hemming services, especially for special garments or when they don't have the time or skills to do it themselves.
Start by offering your services to friends and family at a reduced rate or even for free in exchange for feedback. As you build confidence and a portfolio of work, you can gradually increase your rates to match local tailors. Be clear about your capabilities and turnaround times, and always deliver quality work that you'd be proud to have your name associated with.
Consider specializing in certain types of alterations or fabrics as you gain experience. Some people focus on denim hemming, others on formal wear alterations, and some on everyday clothing adjustments. Finding your niche can help you stand out in a crowded market and command higher rates for your specialized skills.
Conclusion: Your Journey to Hemming Mastery
Mastering the art of hemming dress pants and other garments is more than just a practical skill—it's a gateway to creative expression and independence in your wardrobe. From the forbidden sewing hack that lets you hem in under 5 minutes to the intricate hand stitches that create invisible finishes, you now have a comprehensive toolkit for tackling any hemming project.
Remember that every expert was once a beginner. The key is to start simple, practice consistently, and gradually challenge yourself with more complex techniques and fabrics. Whether you're using a sewing machine for speed and precision or hand sewing for that perfect invisible finish, the principles remain the same: measure carefully, press thoroughly, and stitch with intention.
Your journey to becoming a hemming pro doesn't end here. Each garment you alter teaches you something new, and each technique you master opens up new creative possibilities. Soon you'll be looking at your closet—and perhaps your friends' closets—with a whole new perspective, seeing not limitations but opportunities for transformation. Welcome to the addictive world of professional hemming—where a few minutes of work can completely revitalize your wardrobe.
- Mixed Red And Green Exposed What Youre About To See Will Change Everything Viral Alert
- Ullu Web Series 2025 The Next Wave Of Thrilling Entertainment

How to Hem Dress Pants: 11 Steps (with Pictures) - wikiHow

The diy tailor how to hem dress pants like a pro – Artofit
How to Hem Dress Pants (No Sewing Machine)

