You Won't Believe This Secret Trick For Slope-Intercept Form On Edgenuity – Answers Exposed!
Have you ever stared at a linear equation, completely baffled about how to graph it? You're not alone! Thousands of students struggle with slope-intercept form on Edgenuity, often feeling overwhelmed by the process of converting equations and plotting points accurately. But what if I told you there's a simple, foolproof method that makes graphing these equations almost effortless? This secret trick has been quietly helping students ace their Edgenuity assignments, and today, we're finally exposing it!
Understanding the Basics of Slope-Intercept Form
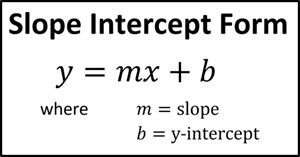
Before diving into the secret trick, it's essential to understand what slope-intercept form actually is. The slope-intercept form of a linear equation is written as y = mx + b, where 'm' represents the slope and 'b' represents the y-intercept. This form is particularly useful because it directly tells you two critical pieces of information about the line: where it crosses the y-axis and how steep it is.
The slope (m) tells you how much y changes for every unit change in x. A positive slope means the line goes up as you move right, while a negative slope means it goes down. The y-intercept (b) is simply the point where the line crosses the y-axis, which occurs when x = 0.
- One Chip Challenge Sex Scandal Leaked Porn Video From Spicy Chip Party
- How Old Is Ace Love Island The Viral Revelation Thats Breaking The Internet
Step-by-Step Guide to Finding Key Points
This guide will help you understand how to find these points and use them to draw a perfect graph, step by step. The first secret trick is to always start with the y-intercept. Since b is the y-coordinate when x = 0, simply plot the point (0, b) on your graph. This gives you a guaranteed starting point that's impossible to get wrong.
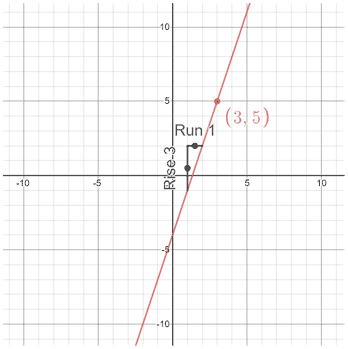
Next, use the slope to find your second point. Remember that slope is "rise over run" or the change in y divided by the change in x. If your slope is 2/3, for example, you would move up 2 units and right 3 units from your y-intercept. If the slope is negative, like -3/4, you'd move down 3 units and right 4 units. This method ensures you always have at least two accurate points to draw your line through.
Writing Equations and Finding Them with Graphs
Learn how to write and find it with graphs and examples. Writing equations from graphs is actually easier than you might think. Start by identifying two clear points on the line, preferably where it crosses grid lines. Calculate the slope using the formula m = (y2 - y1)/(x2 - x1), then substitute one point and the slope into y = mx + b to solve for b.
For example, if you have points (2, 5) and (4, 9), your slope would be (9-5)/(4-2) = 4/2 = 2. Using point (2, 5) and m = 2, you'd write 5 = 2(2) + b, which gives you b = 1. Therefore, your equation is y = 2x + 1. This reverse process is just as important as graphing from equations and frequently appears on Edgenuity assessments.
Advanced Techniques for Perfect Graphs
Once you've mastered the basics, there are several advanced techniques that can help you create even more accurate graphs. One powerful method is to find the x-intercept by setting y = 0 and solving for x. This gives you a third point to verify your line, especially useful when dealing with fractions or decimals in your equation.
Another helpful trick is to use the slope to predict additional points beyond your initial two. If you know your slope is 1/2, you can move up 1 and right 2 repeatedly to generate as many points as needed. This is particularly useful when graphing on larger coordinate planes or when you need to extend your line significantly in either direction.
Common Mistakes and How to Avoid Them
Even with the best techniques, students often make common mistakes when working with slope-intercept form. One frequent error is confusing the slope with the y-intercept, especially when both are fractions or negative numbers. Always double-check which value is which before plotting your points.
Another common mistake is forgetting to simplify fractions when calculating slope. If you get a slope like 6/8, always reduce it to 3/4 first, as this makes plotting much easier and more accurate. Additionally, be careful with negative signs – a slope of -2/3 is not the same as 2/-3, though they may look similar at first glance.
Practice Problems and Real-World Applications
To truly master slope-intercept form, practice is essential. Try graphing equations like y = -3x + 2, y = 1/2x - 4, and y = 4 (a horizontal line). Each type of equation presents unique challenges and helps build your overall understanding. Remember to check your work by substituting points back into the original equation.
Slope-intercept form isn't just an academic exercise – it has numerous real-world applications. Architects use it to design ramps and roofs, economists use it to model supply and demand, and data scientists use it to predict trends. Understanding how to work with these equations opens doors to many practical applications in various fields.
Using Technology to Verify Your Work
While learning to graph by hand is crucial, technology can be a valuable tool for verification. Graphing calculators and online tools like Desmos can help you check your work instantly. Simply input your equation and compare the computer-generated graph with your hand-drawn version. This immediate feedback helps reinforce correct techniques and quickly identify any mistakes.
Edgenuity often includes interactive graphing tools that allow you to plot points and draw lines directly on the screen. Take advantage of these features to practice and receive instant feedback on your work. The more you practice with immediate verification, the faster you'll develop accurate graphing instincts.
Test-Taking Strategies for Edgenuity
When taking Edgenuity assessments on slope-intercept form, employ specific strategies to maximize your success. First, always write down the equation and identify m and b before attempting to graph. This simple step prevents confusion and ensures you're working with the correct values.
Second, use the grid provided to count carefully when plotting points. Don't estimate – use the intersection points of the grid lines for maximum accuracy. If you're unsure about a point, plot it and then verify by substituting back into the equation. This double-checking process can save you from careless errors that cost valuable points.
Conclusion
Mastering slope-intercept form on Edgenuity doesn't have to be a struggle. By understanding the fundamental concepts, using the secret trick of starting with the y-intercept, and practicing with various types of equations, you can confidently tackle any graphing problem that comes your way. Remember that every expert was once a beginner, and with consistent practice using these techniques, you'll soon find yourself graphing linear equations with ease and accuracy. The key is to stay patient, double-check your work, and never hesitate to use available tools and resources to support your learning journey.
Slope Intercept Form

Answered: core.learn.edgenuity. '18 uing the… | bartleby
Slope intercept form

